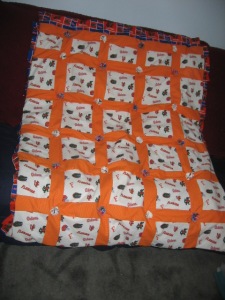
Take Yo-yo Baby Quilt and Go!

Continuing with the projects in Simple Serger Sewing edited by Julie Johnson, I went to the next in sequence, the Yo-yo Baby Quilt, for this week’s remnant re-do.  The blurb said “Fast and easy are the buzz words used in creating this delightful baby quilt…” You know me, fast and easy, and I’m there…except I did not find this project fast or easy.

I had some gator fabric remnants left over from a project, so I cut all the pieces required, according to the directions.

5 yards, MOL, fabric pieces

Then I proceeded to SERGE (since this is a serger project) the blocks to the border strips, as directed, referring to the assembly diagram. Well, the diagram showed 25 7″ x 7″ blocks, 5 7″ x 4″ blocks, and 10 3″ x 45″ border strips. So why did the directions say to cut 11 3″ x 45″ border strips? I never could figure out where the 11th border strip was supposed to go.  And when I serged the blocks to the border strips, of course, the border strips were cut off each time. The directions never warned me that was going to happen. It was a bit unnerving. Also, I didn’t realize it, but somehow I had cut a few blocks 6 1/2″ by 7″, so that on the way, my quilt top started looking like this:

Aaargh! Measure twice, cut once forgotten!

I didn’t see a way that I could remedy this, so perhaps in a future remnant redo, you may see this familiar fabric…

Back to the drawing and cutting board. The next ordeal was the box-pleated ruffles on the sides. Although they look kind of cool, what a pain it was to put them on. And the directions gave a bogus amount of material which meant I ended up piecing together some ruffles on the edges. At this point, I didn’t have enough fabric left that was 45″ long, so I had to make do.

”]I had to go back and cut way more than it called for, to get ruffles down both sides. Oh, the pinning and ironing, offering both stabbing and burning to the occupational hazards of this project. Like I don’t already have enough cuts and burns from cooking! And Sheila the serger was not unscathed either; due to my neglect she ran over a big pin and her needles were badly misaligned, so I was forced to change needles and went through all the bad times of re-threading like I used to do.

Next came the STOO-PID yo-yo’s. I never have liked yo-yo’s. I almost inadvertently roll my eyes at the making of yo-yo’s in any context.  But, this called for yo-yo’s so I got out my heretofore unused Clover yo-yo making gizmo and made the 16 that the directions called for. It said to sew a yo-yo at the intersection of the border strips (however, when I looked at the assembly diagram there were 24 intersections, not 16.  I thought it might look even stupider with only 16–like, where would I decide to put the 16?)  And, since this is a tie-quilt, the yo-yo junctions serving as the ties that keep the batting, top, and bottom together, I thought it needed those extra 8 to keep the layers from separating. I used high-loft crib-size batting (the only thing I broke down and bought for the project, with a 40% off coupon, of course) so it would have a comforter-like feel and weight to it.

serging edges of yo-yo

copius amount of lint piled up

And, did I mention how messy this project was? Piles of lint, scraps, thread, seam allowances, wisps of batting everywhere.

The whole room needs a good cleaning now.

And the STOOPID yo-yo’s had to be hand-stitched through

all layers, or course. I used heavy hand-quilting thread. With

such a large surface to negotiate, I poked the needle through

my fingertips A LOT! That’s why I keep YELLING in this post,

because it hurts to type!

finished (whew!) quilt

backing and box-pleat ruffle

This is the finished (whew!) quilt.

The design was by Lorine Mason. Pretty design, really, but fast and easy? Not really!

If only it had the original blue border strips; however, it now looks much more girlie than I had envisioned. Especially with the flowery-looking yo-yo’s.

But this is my postaweek2011 remnant project of the week!

More Baby Remnant Redo’s

It looks like a crazy week is on its way here!

I have a couple of baby remnant redo’s to show you. They don’t feature the greatest sewing anyone’s ever seen, but I had a little bit of fun and I learned some new things.

Simple Serger Sewing Project

This was entitled “Summer Breeze” as the 2nd project in the book that I blogged about last week, Simple Serger Sewing, edited by Julie Johnson. What an excellent project book; I’ve been learning how to use my serger by going over it chapter by chapter.  Laura Dollar came up with the pattern and instructions, and it’s pretty easy to follow. Except for serging around a curved surface; that was a bit hard to do. I appliqued a bow motif on the back, as you can see in the picture, and embroidered the new baby’s name on the front, which I do not show. It’s supposed to be a cover-up or a bib-like garment. I think that’s a cute idea to be able to throw this on over a plain onesie, for a little girl of course. Maybe a fishing vest in camo flannel for a boy baby?

The cats weren’t so enthusiastic. I tried it on Bob, and after he made a few attempts to jerk it off and couldn’t, boxed Pauly’s ears for no apparent reason and then hid out in the kitchen where no one could see his shame. Then I tried it on Grayzie, and he was all ok with it. He didn’t even try to get it off.

Serging ties is definitely the way to go. Zip, and you’re done, rather than taking hours to sew right-sides together and then try to turn the doggone things inside out. Just make sure to use fray-check on the ends. This remnant was in the stash from years back, a Patty Reed fabric.

[Warning, this aside has nothing to do with the project but I have to get it off my chest: I found Patty Reed’s web site on the Internet, mainly because I was interested in a couple of old Simplicity patterns I want to sew, patterns that feature her design and fabric. The featured fabric is a slinky knit with a double border print on it. I cannot find slinky knit with a border print on it anywhere on the internet now, not even on ebay. So if anyone finds it, I’m interested!]

The second project was a onesie with a machine-embroidered applique on the front that is supposed to approximate a tie and vest; this one, of course, in gator colors.  Every time I embellish a onesie, I say I am never going to do it again, because it is a king-size lot of trouble for a pint-size finished article.

The smaller the onesie, the more my teeth end up being gnashed.

It is nearly impossible to fit a tiny shirt into a 5″ x 7″ (or another size) embroidery hoop, with the part you don’t want sewn bunched up, and have it finish successfully.

Finally, I saw some packing tape on the desk and cut off about a 6″ strip, using it to truss up that back part of the outfit that I didn’t want getting

Tie and vest appliqued onesie

stuck under the hoop and sewed accidentally, which helped some. The little clips you get with the hoop don’t help

a whole lot, because they pop off under the bulk of the garment.

But this is postaweek2011 project #2; looks like kids’ clothes are the trend so far.


Girlie Baby Gator Funsie Onesie

I’ve been wanting to make this for a long time, but I was afraid of my serger! The project instructions can be found in Simple Serger Sewing , edited by Julie Johnson, published by House of White Birches, page 21 article “Funsie Onesie” by Lorine Mason. The same author, Lorine Mason, did a Valentine version of it, published in the magazine Sewing Savvy, January 2009, entitled “Baby Valentine.”

The remnant and other components


My take on this project started with a yard of pink and white girlie-gator collegiate fabric, leftover from another project. Add to that a onesie (I made three for this project) and a package of bias tape in a color coordinated with the fabric. I had a package I had gotten from a yard sale, with a date of 1978 on the back! It says on the back: “Does your child sew? Send 3 labels and $1.00 for a generous package of clippings of Wright’s Trimmings for doll’s clothes. Allow about 4-6 weeks for delivery. Include zip code with address.” Love it!!!! Those were the good old days, huh?

I used about half a yard to make the skirts for 3 onesies, so I have a little bit of the pink gator fabric left for a future project. I made two  size 6 months and one 24 months. For the older baby’s outfit, I sewed on a rosebud at the neckline in lieu of the three buttons along the tummy. Reasons: I only had 6 buttons, and I figured the older baby would be more likely to wrench off the buttons than the young baby, who is still struggling with how to use her various appendages.

6 month size, with buttons

24-month size, with rosette

A word for the penny pincher: I bought a litter of onesies on a collective hanger when I visited Lakeland, at the Burlington Coat Factory. The off brand, SpaSilk, onesies are less than half the price of Carter’s onesies, tag price $9.99 for five vs $24.00 for four. And the SpaSilk ones even came in colors and patterns, and were very soft. No word on the durability of each after the usual use and abuse. Hey, where can I find a baby model?

I think, upon studying the larger one, that the skirt could be made longer and attached further down on the garment. This finished onesie, with the 5″ wide ruffle (the engineer spouse refers to it as a flap),  would be cute with a pair of pink trousers. Perhaps if the ruffle was 10″ wide, it would look more like a skirt.  So this is my first remnant redo of 2011 and my first postaweek project!


mybeautfulthings

Finding the beautiful in the everyday

Spiritually Fit Yoga

Spiritually Fit Yoga

Watts Up With That?

The world's most viewed site on global warming and climate change

Katy Trail Creations

Creating Memories through Writing, Hobbies and Photos. And I play & teach 5-string banjo.

Snopes.com

thrifty creations

The Rookie Father

A playbook for men experiencing fatherhood for the first time.

Crafting with Limits

We have limitations, but we want to do things in spite of them

Franque23's Blog

Let's think about it!

D.I.Y-ing Machine

All you can do, by yourself.

Linda Andrews

Hope and Humor in Dark Times

Gerry's Family History

Sharing stories from my family history

In the Dash

Valarie Gravelle's family history and genealogy blog

(Ashe Ancestors)

Family history in Ashe County, North Carolina

Rainne's Ramblings

Books, Crafts and Life...

Best DIY ideas

diy ideas for home decor, diy ideas for christmas gifts for parents and diy ideas for garden furniture

trish stitched

Handbag Designer, Blogger, Petite Apparel Maker

Chaotic Shapes

Art and Lifestyle by Brandon Knoll

Scribblers Arena

Trust Your Own Madness !

View through my window

A unique perspective on Spirituality, Philosophy and Love.

Laura’s Craft Closet

Your Favorite Place for Crafting and Card-Making Tips and Tutorials

Puerto Rico Newcomer, dedicated to improving PR, helps you live, vacation in Puerto Rico better

The most useful site if you live or vacation in Puerto Rico. Making your life easier in Puerto Rico whether as a visitor, on vacation, on holiday, or a resident

Estonian Cuisine. Eesti Toit.

Estonian Food and Cuisine. Easy and Delicious.

Phoenix Wear LLC

Fun Stylish Clothing Just for Boys

Shaking The Branches

Sharing Stories From My Family Tree

Rabbit Lane

Roger Baker's Personal Essays, Poems, and Memoir.

Swamp Ape Studios

Metal clay the swamp ape way

Katzenworld Shop

The purrfect shop for cat lovers and the whole family

It's a cats life !

the life of cats

How to Provide

for your family

Season Six(ty)

MY LIFE IN THE SIXTY-SOMETHING YEARS

PastToPresentGenealogy

Jane Roberts: Yorkshire-Based Professional Family and Local History Researcher

Whitewater Musings

Life as a Single Mom, facing what life throws my way head on.

Piedmont Trails

Genealogy and History in North Carolina and Beyond

383 Degrees

383 Design Studio's Digital Fashion Design Blog

Synchronicity Of The Heart

"like amnesiacs in a ward on fire we must find words or burn" Olga Broumas

i-adobe

Solutions for ADOBE program questions

Visual Sketchpad by Queenie Lamb

Design with passion. Create with imagination. Express with Inspiration.

Muddling Through My Middle Age

Definitely older, possibly wiser....

Painting to see : Peindre pour voir

Drawing & painting by sketching from life, working from imagination & learning from the Masters